
Cricut shirt making is one of the best ways to use an electronic cutting machine. Learn how to make t shirts with a Cricut from the beginning to end!
My favorite crafting tool is hands down my Cricut. If you’ve been following me a while then you know how much I love my cutting machine.
I absolutely love having control over personalizing whatever I want. Making t shirts with my Cricut is one of the reasons I bought a Cricut in the first place and oh my, have the shirts I’ve made gotten better over the past eight years!
So for this tutorial, I wanted to share everything that goes into Cricut shirt making from the beginning to the end. We will cover how to design a custom shirt in Cricut Design Space, to cutting it, weeding the iron-on vinyl and then how to apply the design to a t-shirt.
Cricut beginners, I have you in mind for this project, so we will be going very in-depth on how to make shirts with a Cricut.
I also have a full video tutorial at the bottom of the post, a list of Cricut shirt ideas, and printable directions. If you like this Cricut shirts tutorial, I’d love if you’d give it a star rating at the bottom!


What is the Best Cricut for Making Shirts?
Disclosure: This post contains affiliate links from Amazon, ExpressionsVinyl.com and/or Cricut.com. I receive a small commission at no cost to you when you make a purchase using my links (purple text). As an Amazon Associate, I earn from qualifying purchases.
This is a question I get asked a lot so I thought we’d start here. The simple answer is ANY!
The three Cricut vinyl cutting machines out now are the Cricut Explore family, Cricut Joy, and the Cricut Maker. The Cricut Explore 3, Cricut Explore Air 2, Cricut Joy, Cricut Joy Xtra, Cricut Maker, and the Cricut Maker 3 cut iron-on vinyl or HTV for shirts the same way. The bigger machines even use the same blade and housing.
You’ll need the fine point blade for cutting all types of vinyl. This blade comes standard in all Cricut machines.
If you want to know more about the differences between the Cricut machines, I have an entire post on which Cricut is best for you if you want to check it out.
Which Vinyl do I use for Cricut Shirts?
Craft and Cricut vinyl has confused everyone at some point! There are so many different vinyls and they are needed for different projects. The two main types of vinyl are adhesive vinyl and iron-on vinyl.
For making t shirts or sweatshirts, you will need iron-on vinyl or heat transfer vinyl (or HTV). A common question is, what is the difference between iron-on vinyl and HTV? Simple answer… Nothing!
And to make things a bit more confusing different brands call the type of vinyl that adheres to materials with heat by different names. Cricut vinyl for shirts is called iron-on vinyl. Other companies call it heat transfer vinyl or HTV for short. So it is the same thing, just different brand names.
Iron on vinyl, heat transfer vinyl, and HTV are all used interchangeably among crafters, so just know it’s the same thing.
Popular brands of heat transfer vinyl are Siser Easyweed and Fame Crafts HTV. My personal favorites to use are Cricut iron-on vinyl and Siser Easyweed. ExpressionsVinyl.com is a great place to buy Siser brand and Cricut.com has deals on their iron-on vinyl. Plus Amazon always has everything!
Then all brands have different types of iron-on vinyl. Specialty iron-on vinyl includes patterned, glitter, holographic, sparkle, printable, mesh, flex, mosaic, and more. My recommendation would be to try at least two different brands and see which one you like working with the best when making custom t-shirts.
Make sure to check out my comparison post on the best vinyl for any Cricut.
What Other Tools Are Needed for Cricut Shirt Making?
Besides a Cricut and iron-on vinyl, you will need a few other supplies when you begin making shirts for the first time. Make sure to check out my must have Cricut accessories if you are wondering about what else is available.
- Weeding tools – you will need a tool to weed out (or remove the excess) iron-on vinyl
- Light Grip Cricut Mat blue Cricut mat (or older standard mat (green) that’s less sticky) – just make sure the mat is clean
- A heat source – either an EasyPress, heat press, or household iron.
- Something under the heat source like an EasyPress mat or towel.
- Telfon sheets or protective sheet, like wax paper for best results
- Laptop or computer to design your shirt in Cricut Design Space
Designing a Shirt in Cricut Design Space
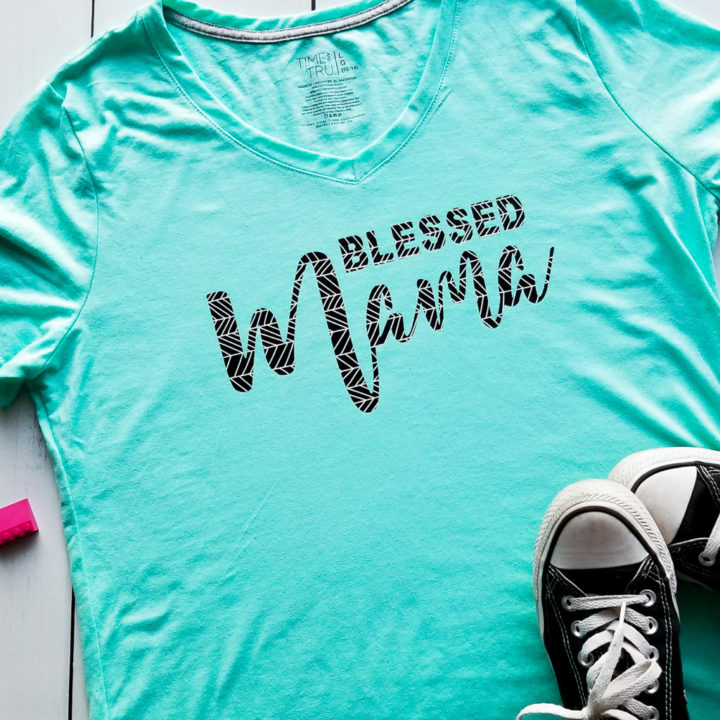
So now you know what Cricut and supplies you need, let’s get started in designing a custom t-shirt in Cricut Design Space. (In case you just want to use my Blessed Mama SVG file, I have it for you to download for FREE below!)
Probably the hardest part of making a shirt is deciding on what design you want to put on it. But the great thing is you can make as many shirts as you want!
If you don’t want to use your own design or design something yourself, there are tons of sites that have free SVG files or you can purchase one off of Cricut Access or Etsy. I have an entire section of SVG files you can choose from including free blessed files, Dog Mom SVG, Boy Mom SVG, and so much more!
But if you are wanting to make really unique shirts, then learning how to use and design in CDS is essential. Once you get used to it, it’s really pretty straight forward software. I have a five-part series on in-depth Cricut Design Space tutorials if you need additional help learning about it.
For this shirt tutorial, let’s make something easy like just words and free to get you used to it. Again all of this is in the video tutorial at the bottom of the post, but I will write out all the steps too. There is a short overview video at the top (or side) for those that might just need a little refresher.
Open up Cricut Design Space and click on New Project. CDS is now offline so you will have to download it if you haven’t already done so.
A blank canvas will open up like this.


Click on the text button on the left side. I like to put my words into different text boxes so I can use different fonts and manipulate the size easier.
After you click on the button, a box will pop up. Type a word in it. For this custom shirt, I type “BLESSED” into one text box. I clicked on “Text” again and typed “Mama” into the second box.
Then I click back on “Blessed”. Then I clicked on the font drop down on the top left and picked a block text. Since most computers come with Arial, I selected Arial bold.


Then I clicked on “Mama” and selected a script font. Just pick one you like and already have installed on your computer. I couldn’t remember what was standard so I picked Best Dreams.
If you want to learn more about text, make sure to read where I get free fonts from and how to upload them to CDS.


Once they are the way you want them, use your cursor to put a box around “Mama” and click the weld button on the lower right. This will connect all the letters so they are one continuous cut.


Click on the individual words and then use the double arrow to make them bigger or smaller. You can always click the lock to unlock if you want to change them unproportionate.
Move the words around until they are exactly as you want them on your t shirt. Now use your cursor to put both words in a box and click on “attach” on the lower right corner.
This will tell the Cricut to cut them exactly as they are. (If you are going to use more than one color of vinyl, only attach the words or images that will be the same color).


The next step is optional but I always like to see what my Cricut t shirt will look like by using templates. Click on the template button on the top left side and a whole bunch of different templates pop up. I scrolled down until I saw scoop neck shirt.


When you click on it, it will bring it onto the canvas. Now you can change the type, size, and color if you want to see exactly what it will look like.
I’m not too picky about the color part, but I like to see how big I want the iron-on image on my shirt.


Then I move the wording into the center of the shirt and use the double arrow circle to drag until the size I want it.
I still always measure my shirt that I am going to be using to make sure it’s about the same size as the one on the screen.


Make sure to SAVE your design.


Now we are ready to hit Make It on the top right corner.
How to Cut Iron On Vinyl with a Cricut
The most important thing you need to remember when making shirts is that you need to cut your iron-on vinyl in MIRROR setting.
This is because the plastic transfer sheet is on the front side so when you apply the heat to the plastic the bottom of the iron-on vinyl will melt and adhere to the fabric.


There are two places to turn on Mirror setting. The screen that comes up after you click Make It will be the prepare screen. Simply click the button so that it turns green next to “Mirror?”.
Your entire text or image will flip over on its own. If you don’t remember on this screen, you can also change on the Make It screen. And Cricut is so smart that they also have it on the instruction page after you select your material.
HTV or Iron On Vinyl Setting
If you have a Cricut Explore Air or Cricut Explore Air 2, turn the wheel to Iron-On. I find you get the best results if you turn the wheel to Custom and then use the drop-down menu as I do with my Maker.
If you are using everyday iron-on vinyl, then this setting will show up on Popular Materials and you just need to click on it. But if you are using a specialty iron-on vinyl, then I like to hit the Search all materials and use the drop-down menu to select “Iron on vinyl”.


Then all of the different Cricut iron on vinyl settings will pop up. Scroll down and click on the type you are using. I love that this takes the guesswork out of using the setting wheel.


Then you will get the instruction screen. This screen will tell you exactly what you need to do to cut iron on vinyl.
See how there is a little caution triangle that says, Make sure Mirror is turned on and that your material is placed shiny side down on the mat? I mentioned how smart the Cricut is, right?


Applying HTV to a Cricut Mat
Cricut mats come in different grip strengths (depends on how strong the adhesive is). A light grip (or blue) mat is recommended for all types of vinyl since it sticks pretty easily to a mat.
If I have an older standard (green) cutting mat that has lost a lot of its tackiness, I will use that if I don’t have a blue mat handy.


Iron on vinyl will have a shiny side with a plastic backing and a duller side.


Place the iron on vinyl with the plastic backing (or shiny side) DOWN on the Cricut mat. If you are using a patterned iron-on vinyl like I am, the pattern will go face down.


Then I like to use a brayer to make sure it’s nice and flat.
When the arrow link starts blinking on your Cricut machine, push the mat all the way up to the rollers and under the brackets. Push the blinking light to load the mat.


Once the Cricut light starts blinking, push it and let the Cricut do its thing!
Applying Iron-On Vinyl to a Shirt
At this point, I like to turn on my EasyPress 2. When I checked Cricut heat guide, it said to preheat the EasyPress to 340F for patterned iron-on vinyl and set the time to 30 seconds. Or use my free printable EasyPress 2 settings guide.
If you don’t have an Easy Press, make sure to check out my tutorials on how to use a heat press and how to apply HTV with an iron if you are using one of those.
When the Cricut has stopped and the arrow light starts blinking, push it to unload the mat. Cut off any extra vinyl so you don’t waste it. (I accidentally cut off a part of my design… ugh… try not to do that!)


Use a weeding tool to remove the extra pieces of HTV (this is called weeding). I like to start from a corner and hook my tool into the vinyl and pull it up.


Keep pulling the iron-on vinyl until all of the excess is removed. Then use the tool to remove the little pieces inside the letters.


Once the Cricut EasyPress is preheated, place the t shirt on an EasyPress mat or towel and press it for about 5 seconds. This helps remove the moisture out of the shirt.
To find the center, I like to fold my shirt in half and press it in the middle. This forms a crease. Then I gently fold my iron-on vinyl image in half to form a crease.


Now it’s easy to line up the middle of the shirt with the middle of the iron-on.


You’ll notice I’m missing a small piece of my image…eek! I address how I fixed this in the video at the bottom, so make sure to watch it if you are curious. (or you can save this post to watch later!)


Press the iron-on vinyl for 30 seconds. Let it cool slightly and then remove the plastic backing.


Now flip the Cricut t shirt over and press the backside for 15 seconds. That’s it!


If you need more inspiration, make sure to check out our Cricut shirt ideas list!


If you want to learn more ways to on using your own design to personalize shirts, check out my posts on screen printing and sublimation shirts! There are so many fun ways to make custom t-shirts!
FREE Blessed Mama SVG Cut File
Sometimes the file will look blurry when you first open it, but once you download it, the SVG will open up clearly.
If it doesn’t automatically download, you might need to right-click on it and Save As. If you need additional help, make sure to check out my post on how to download and upload files to CDS.
Or check out my Cricut Design Space 101 series for even more tutorials.
As a reminder, all of my FREE SVG files are for personal use only and not for commercial use. Please click here to purchase a commercial license if you want to use the files for commercial purposes such as to sell items for your small business.
To use the file I used, click here to download it.


Making Shirts with Cricut Video Tutorial
If you’d like to watch a full detailed tutorial on making a shirt with a Cricut machine, hop on over to my YouTube channel here.
And here are some printable directions for making your own shirt with a Cricut vinyl machine. If you liked this post, I would love if you could rate it in the star rating below!
Cricut Shirt Making for Beginners: Step by Step Tutorial!
Cricut shirt making is a great beginner project for Cricut users! Learn how to make t shirt designs, cut iron-on vinyl, and apply HTV to shirts.
Materials
- Shirt
- Iron On Vinyl
- Weeding tool
Instructions
- Open up Cricut Design Space, and select a new project. Insert an image or text of your choice.
- Use templates to size your image or measure the size of your shirt.
- Save your design and click Make It.
- Change the setting to "Mirror" on the next screen.


- Select iron-on vinyl as a setting or find a specialty iron-on vinyl in the drop-down menu.
- Apply the iron-on vinyl to a light grip mat with the SHINY SIDE DOWN.
- Load the mat and let the Cricut cut your design.
- Weed out the extra vinyl.
- Preheat your EasyPress to the temperature on the Cricut Heat Guide.
- Press a prewashed shirt for 5 seconds to remove the moisture.
- Optional to center - fold the shirt and press down to get a crease and fold the iron-on vinyl in half to get a crease. Match up the creases.
- Place the image on the shirt with the plastic backing facing up (so the words are going the correct way). Press the front side for 30 seconds. Remove the plastic backing.
- Flip the shirt over and press for 15 seconds.
- Your new Cricut shirt is all done and ready to wear!
Notes
See the post for a full step by step picture and video tutorial on every single step.
Recommended Products
As an Amazon Associate and member of other affiliate programs, I earn from qualifying purchases.

Now that you know how to make vinyl shirts with a Cricut, I wanted to give you some Cricut shirt ideas. These are some of the shirts or onesies I’ve made with my Cricut in the past.
If you’d like to save this DIY custom shirt tutorial for later or share it, simply hover over the top left of the image below and PIN It now!


Thanks so much for stopping by and have a creative day,


!")
!")
Stacey L
Tuesday 4th of May 2021
Hello Amyy question is how can I change my image to svg to save to cut on cricut machine. I'm having yhe hardest time just starting very frustrated. Please help is there a program that I need to use. The 1 I did use onve downloaded it said it was ro large.
Leap of Faith Crafting
Thursday 6th of May 2021
@Stacey L, There are a few free online converters that you can convert images to SVG. Or there is Inkscape or Adobe Illustrator that gives you an option saving as .svg. What kind of file is it? I do have this tutorial on uploading files and making layers out of them: https://leapoffaithcrafting.com/how-to-upload-images-to-cricut-layer/
Lee
Sunday 7th of February 2021
Amy, I don’t understand how you got from the weeded vinyl, face down on the cutting mat, to the placement of the image on the shirt to be heat pressed. Specifically, how did you get the weeded-vinyl off the mat, to turn it right side up? What am I missing, please?
Leap of Faith Crafting
Wednesday 10th of March 2021
There is a plastic backing on iron-on vinyl and after you weed off the extra iron-on, the part that you are going to press is still stuck to the plastic backing. It's clear so it's hard to tell it's on the mat, but it's there! Then you just pull the plastic backing off the mat and everything comes with it. Then when it goes on the shirt the plastic backing will be on top of the design (that's why we cut it on mirror setting) and you press the plastic backing to protect the htv.
Tracy
Wednesday 25th of November 2020
I tried cutting an everyday iron-on but it didn’t cut all the way through. I double checked my material was set correctly and it is shiny side down. What could I be doing wrong?
Leap of Faith Crafting
Tuesday 1st of December 2020
It's not supposed to cut the plastic backing. You mean it's not cutting the top layer of just the iron-on vinyl?? Make sure your blade is clean. Punch it into a ball of foil to clean it and sharpen it some and make sure it's inserted correctly. If you are on the correct setting of iron-on vinyl and have the material shiny side down, the problem is probably the blade or housing.
Gale Trego
Sunday 2nd of February 2020
LOVE THAT!!! YOUR VIDEOS ARE SO ENJOYABLE TO WATCH AND LISTEN TO. I'D LIKE TO REQUEST ON OF FOIL! I DON'T SEE WHERE YOU GOT YOUR FONT AT, DID I JUST MISS IT? I ALSO GAVE IT FIVE STARS. LOOKING FORWARD TO THE NEXT ONE. FINGERS CROSSED.
WELL DONE P.S. GET YOUR CRAFTING ON
Leap of Faith Crafting
Thursday 6th of February 2020
Thanks Gale! You are so sweet! I did list what font I used plus you can also grab the free SVG file. Blessed was in Arial bold and Mama was Best Dreams, which is a paid font. I will add foil to my list! Have a great day!
Sherry
Saturday 1st of February 2020
Awesome tutorial !!! It was so very helpful to have the step by step information. I rated it 5 stars but I don't know if it went through though. Thank you so very much .
Leap of Faith Crafting
Sunday 2nd of February 2020
Thank you so much!